API Client Registration
Learn how to register and manage API clients in the Exepron Identity Server. This guide covers client types, configuration options, and best practices for securing your integration.
{YOUR_IDENTITY_SERVER} with your Identity Server URL (e.g., identity.yourdomain.com or localhost:44367 for local development) and {YOUR_API_SERVER} with your API Server URL (e.g., api.yourdomain.com or localhost:44395 for local development).
https://{YOUR_IDENTITY_SERVER}/Identity/Account/Manage/ApiClients in your profile settings.
On this page
What are API Clients?
API clients are applications that interact with the Exepron REST API on behalf of users or systems. Each client must be registered in the Exepron Identity Server to obtain credentials for authentication.
Key Concepts
Client ID
A unique public identifier for your application. This is safe to expose in client-side code.
Client Secret
A private key used to authenticate confidential clients. Must be kept secure and never exposed in client-side code.
Grant Types
OAuth 2.0 flows that the client is allowed to use (e.g., authorization_code, password).
Scopes
Permissions that define what resources the client can access.
When You Need an API Client
- Building a web application that integrates with Exepron
- Creating a mobile app for project management
- Developing automated scripts or services
- Integrating Exepron with other business systems
- Building custom dashboards or reporting tools
Client Types
Exepron provides three simplified templates for creating API clients. Choose the template that best matches your use case:
Personal Access Token (PAT)
Best for: Quick testing, personal scripts, and CLI tools
Use Cases:
- Testing API endpoints in Postman or curl
- Personal automation scripts
- One-off data imports/exports
- Development and debugging
Configuration:
- Grant Type: Password (Resource Owner)
- Secret Required: Yes (included in token)
- Token Expiration: 30 days, 90 days, 1 year, or never
- Scopes: exepron.restapi, exepron.restapi:extended
Token Format:
exepron_pat_[client-id]:[secret]

Example:
exepron_pat_abc123def456:dGVzdHNlY3JldA==
Backend Service
Best for: Server-to-server integrations and automated services
Use Cases:
- Scheduled jobs and background workers
- Integration services (ETL, data sync)
- Microservices communicating with Exepron
- Server-side automation
Configuration:
- Grant Type: Password (Resource Owner)
- Secret Required: Yes
- Token Lifetime: 1 hour
- Scopes: openid, profile, exepron.restapi
Web/Mobile App
Best for: User-facing applications that require user authentication
Use Cases:
- Single-page applications (React, Angular, Vue)
- Mobile applications (iOS, Android, React Native)
- Progressive Web Apps (PWAs)
- Desktop applications with web views
Configuration:
- Grant Type: Authorization Code with PKCE
- Secret Required: No (public client)
- PKCE: Required (SHA256 only)
- Token Lifetime: 1 hour (access), 30 days (refresh)
- Scopes: openid, profile, email, exepron.restapi, offline_access
- Redirect URIs: Required (must be pre-registered)
Comparison Table
| Feature | Personal Access Token | Backend Service | Web/Mobile App |
|---|---|---|---|
| Grant Type | Password | Password | Authorization Code + PKCE |
| Requires Secret | Yes (embedded in token) | Yes | No |
| User Context | Yes (creator's identity) | No | Yes (authenticated user) |
| Refresh Tokens | No | No | Yes |
| Redirect URIs | Not required | Not required | Required |
| Best Use Case | Quick testing, scripts | Server-to-server | User-facing apps |
Step-by-Step Registration Guide
Follow these steps to create API clients in the Exepron Identity Server:
Access API Client Management
Navigate to the Exepron Identity Server and log in:
https://{YOUR_IDENTITY_SERVER}Then access the API Client Management page via your profile settings.

Choose Client Template
Select one of the three available templates based on your use case:
- Personal Access Token: For testing and scripts
- Backend Service: For server-to-server integration
- Web/Mobile App: For user-facing applications
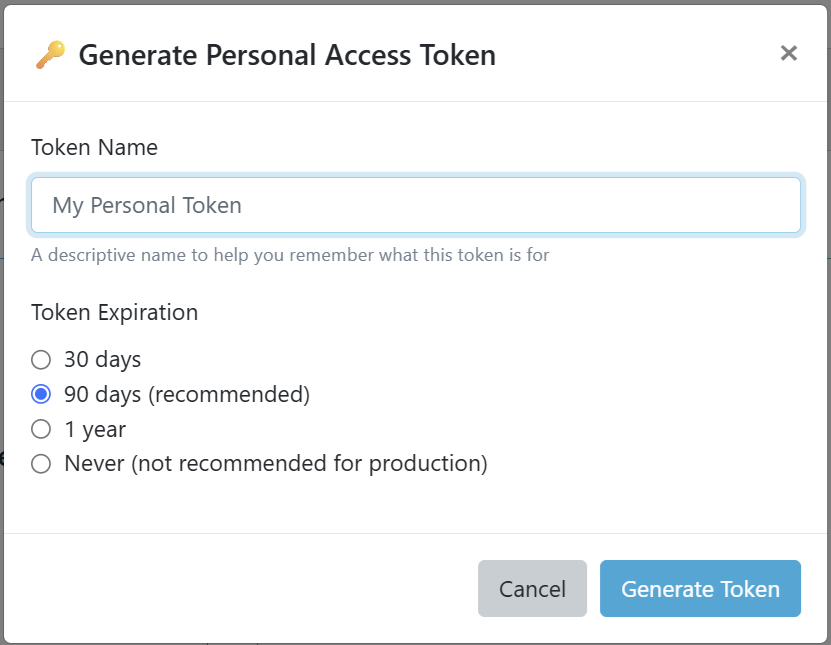
Creating a Personal Access Token
Fill in Token Details
Provide the following information:
- Token Name: A descriptive name (e.g., "Local Development Testing")
- Token Expiration: Choose from 30 days, 90 days, 1 year, or never
Copy Your Token
After creation, copy your token immediately - it won't be shown again:
exepron_pat_abc123def456:dGVzdHNlY3JldA==

⚠️ Store this token securely!
It won't be shown again.
Usage: Use this token as a Bearer token in the Authorization header:
curl -H "Authorization: Bearer exepron_pat_abc123def456:dGVzdHNlY3JldA==" \
  https://{YOUR_API_SERVER}/odata/Projects
Creating a Backend Service
Fill in Service Details
Provide the following information:
- Service Name: A descriptive name (e.g., "Data Sync Service")
- Description: Optional description of the service's purpose
Copy Credentials
Save your client credentials immediately:
Client ID: service_abc123def456
Client Secret: dGVzdHNlY3JldA==

⚠️ Store these credentials securely!
The secret won't be shown again.
Usage: Exchange credentials for an access token:
POST https://{YOUR_IDENTITY_SERVER}/connect/token
Content-Type: application/x-www-form-urlencoded

grant_type=password
&username=USER_EMAIL
&password=USER_PASSWORD
&client_id=service_abc123def456
&client_secret=dGVzdHNlY3JldA==
&scope=exepron.restapi
Creating a Web/Mobile App
Fill in App Details
Provide the following information:
- App Name: A descriptive name (e.g., "React Dashboard")
- Redirect URLs: One per line (HTTPS required for production)
https://app.example.com/callback http://localhost:3000/callback - Description: Optional description
Copy Client ID
No client secret is needed (public client). Copy your client ID:
Client ID: app_abc123def456
Grant Type: Authorization Code + PKCE
Redirect URIs:
- https://app.example.com/callback
- http://localhost:3000/callback
Usage: Implement Authorization Code flow with PKCE in your application. See the Authentication Guide for detailed implementation examples.
Client Configuration Options
Essential Settings
| Setting | Description | Default | Recommended |
|---|---|---|---|
| Access Token Lifetime | How long access tokens are valid | 3600s (1 hour) | 3600s |
| Refresh Token Lifetime | How long refresh tokens are valid | 2592000s (30 days) | 2592000s |
| Require PKCE | Enforce PKCE for authorization code flow | False | True (always) |
| Allow Offline Access | Enable refresh tokens | False | True |
| Sliding Refresh Token | Refresh token renews on use | False | True |
| Update Access Token on Refresh | Update claims on token refresh | False | True |
Configuration Examples
Single Page Application (SPA)
{
  "clientId": "spa-client",
  "clientName": "React Dashboard",
  "clientType": "public",
  "grantTypes": ["authorization_code"],
  "redirectUris": [
    "https://app.example.com/callback",
    "http://localhost:3000/callback"
  ],
  "postLogoutRedirectUris": [
    "https://app.example.com",
    "http://localhost:3000"
  ],
  "allowedCorsOrigins": [
    "https://app.example.com",
    "http://localhost:3000"
  ],
  "requirePkce": true,
  "allowOfflineAccess": true,
  "scopes": ["openid", "profile", "api1", "offline_access"]
}
Mobile Application
{
  "clientId": "mobile-app",
  "clientName": "Exepron Mobile",
  "clientType": "public",
  "grantTypes": ["authorization_code"],
  "redirectUris": [
    "com.exepron.mobile://callback",
    "exepron://oauth/redirect"
  ],
  "requirePkce": true,
  "allowOfflineAccess": true,
  "refreshTokenLifetime": 7776000,  // 90 days for mobile
  "scopes": ["openid", "profile", "api1", "offline_access"]
}
Backend Service
{
  "clientId": "backend-service",
  "clientName": "Data Sync Service",
  "clientType": "confidential",
  "grantTypes": ["password"],
  "clientSecrets": [
    {
      "value": "supersecret123",
      "expiration": "2026-01-01"
    }
  ],
  "scopes": ["api1"],
  "claims": [
    {
      "type": "service",
      "value": "data-sync"
    }
  ]
}
Redirect URI Configuration
URI Requirements
- Must be absolute URIs (not relative paths)
- HTTPS required for production (HTTP allowed only for localhost)
- Exact match required (no wildcards in production)
- Case-sensitive matching
- Query strings and fragments not allowed
Common Redirect URI Patterns
Web Applications
# Production
https://app.example.com/auth/callback
https://app.example.com/silent-renew

# Staging
https://staging.example.com/auth/callback

# Development
http://localhost:3000/auth/callback
http://localhost:4200/auth/callback
http://127.0.0.1:8080/callback
Mobile Applications
# iOS (Custom Scheme)
com.example.app://oauth/callback
com.example.app://auth/redirect

# iOS (Universal Links)
https://app.example.com/ios/oauth/callback

# Android (Custom Scheme)
com.example.app://oauth/redirect

# Android (App Links)
https://app.example.com/android/oauth/callback
Desktop Applications
# Loopback for native apps
http://localhost/callback
http://127.0.0.1:PORT/callback

# Custom protocol
myapp://auth/callback
Silent Token Renewal
For SPAs, configure a separate URI for silent token renewal:
// Main callback
https://app.example.com/callback

// Silent renewal frame
https://app.example.com/silent-renew.htmlScopes Assignment
Understanding Scopes
Scopes define what resources and operations your client can access. Follow the principle of least privilege - only request scopes you actually need.
Available Scopes
Identity Scopes (OIDC)
| Scope | Description | Claims Included |
|---|---|---|
openid |
OpenID Connect protocol | sub (user ID) |
profile |
User profile information | name, given_name, family_name, preferred_username |
email |
Email address | email, email_verified |
address |
Physical address | address |
phone |
Phone number | phone_number, phone_number_verified |
API Access Scopes
| Scope | Description | Access Level |
|---|---|---|
api1 |
Full API access | Read/Write all resources |
api1.read |
Read-only API access | Read all resources |
projects |
Project management | CRUD on projects |
projects.read |
View projects | Read projects only |
tasks |
Task management | CRUD on tasks |
tasks.read |
View tasks | Read tasks only |
resources |
Resource management | Manage team/equipment |
reports |
Reporting access | Generate/view reports |
webhooks |
Webhook management | Configure webhooks |
admin |
Administrative access | All operations |
Special Scopes
| Scope | Description | Use Case |
|---|---|---|
offline_access |
Refresh tokens | Long-lived access without re-auth |
role |
User roles | Include roles in token |
Scope Combinations
Common scope combinations for different use cases:
# Read-only dashboard
scopes: ["openid", "profile", "api1.read"]

# Full-featured web app
scopes: ["openid", "profile", "email", "api1", "offline_access"]

# Backend service
scopes: ["api1"]

# Mobile app with offline support
scopes: ["openid", "profile", "api1", "offline_access"]

# Reporting tool
scopes: ["projects.read", "tasks.read", "reports"]
Client Secrets Management
Generating Secrets
Client secrets are automatically generated when creating confidential clients. You can also generate new secrets manually:
# Generate a secure secret (example)
openssl rand -hex 32
# Output: 7f3d8c2a9b5e4f1d8a6c3e2f9d5b7a1c4e8f2a5d7b9c3e6f8a2d5e8b1c4f7a9d
Secret Rotation
Regularly rotate client secrets for security:
Generate New Secret
Add a new secret without removing the old one
Update Applications
Deploy your application with the new secret
Monitor Usage
Ensure all instances are using the new secret
Remove Old Secret
Delete the old secret after verification
Storing Secrets Securely
DO:
- ✅ Use environment variables
- ✅ Use secret management services (Azure Key Vault, AWS Secrets Manager)
- ✅ Encrypt secrets at rest
- ✅ Use different secrets per environment
- ✅ Rotate secrets regularly
DON'T:
- ❌ Commit secrets to version control
- ❌ Include secrets in client-side code
- ❌ Share secrets via email or chat
- ❌ Use the same secret across environments
- ❌ Log or display secrets in plain text
Environment Variable Example
# .env file (add to .gitignore!)
EXEPRON_CLIENT_ID=web-dashboard-prod
EXEPRON_CLIENT_SECRET=7f3d8c2a9b5e4f1d8a6c3e2f9d5b7a1c

# Node.js usage
const clientId = process.env.EXEPRON_CLIENT_ID;
const clientSecret = process.env.EXEPRON_CLIENT_SECRET;

# .NET usage
var clientId = Configuration["Exepron:ClientId"];
var clientSecret = Configuration["Exepron:ClientSecret"];

# Python usage
import os
client_id = os.environ.get('EXEPRON_CLIENT_ID')
client_secret = os.environ.get('EXEPRON_CLIENT_SECRET')
Managing Existing Clients
Viewing Your API Clients
Access the API Client Management page to view all your clients:
- Client Name and ID
- Client Type (Personal Token, Backend Service, Web/Mobile App)
- Grant Types and Scopes
- Creation date and last accessed date
- Active/Inactive status
Editing Clients
You can update certain properties of existing API clients. The editable fields depend on the client type:
Web/Mobile App Clients:
- Display Name: Update the application name (3-200 characters)
- Description: Update or add an optional description
- Redirect URIs: Modify callback URLs for authentication (one per line)
- Post-Logout Redirect URIs (same as Redirect URIs)
- Allowed CORS Origins (extracted from Redirect URI origins)
Backend Service Clients:
- Display Name: Update the service name
- Description: Update or add an optional description
Personal Access Tokens:
- Display Name: Update the token name
To edit a client:
- Navigate to the API Client Management page
- Find the client you want to edit
- Click the Edit button (pencil icon)
- Modify the desired fields in the edit modal
- Click "Save Changes"
Regenerating Client Secrets
If you need to rotate or regenerate a client secret:
- Navigate to the API Client Management page
- Find the client you want to update
- Click the "Regenerate Secret" button
- Copy the new secret immediately (it won't be shown again)
- Update your application with the new secret
Secret Rotation Best Practices:
- Rotate secrets regularly (every 90-180 days)
- Set calendar reminders for secret expiration dates
- Test with new secret before revoking old one (if possible)
- Keep a secure backup of active secrets
- Document which services use which clients
Deactivating Clients
Temporarily disable a client without deletion:
- Navigate to the API Client Management page
- Find the client you want to deactivate
- Click the "Deactivate" button
- Deactivated clients cannot authenticate until reactivated
Client Limit
Each account is limited to 10 active API clients. To create new clients after reaching the limit:
- Deactivate unused clients
- Delete clients that are no longer needed
- Consolidate multiple clients if possible
Monitoring Client Usage
Track when your clients were last used:
- Created On: When the client was first created
- Last Used On: When the client last successfully authenticated
Use this information to identify unused clients that can be safely deactivated or deleted.
Best Practices
1. Use Separate Clients per Environment
Create distinct clients for development, staging, and production:
myapp-dev     → Development
myapp-staging → Staging
myapp-prod    → Production
2. Follow Naming Conventions
Use consistent, descriptive names:
Format: [app]-[platform]-[environment]
Examples:
- dashboard-web-prod
- mobile-ios-staging
- sync-service-dev
3. Implement Least Privilege
Only request the minimum scopes needed:
# Too broad
scopes: ["api1", "admin"]

# Better
scopes: ["projects.read", "tasks.read"]
4. Regular Audits
- Review client list quarterly
- Remove unused clients
- Verify scope assignments
- Check for suspicious activity
- Update redirect URIs
5. Document Your Clients
Maintain documentation for each client:
- Purpose and owner
- Deployment locations
- Contact information
- Dependencies
- Rotation schedule
6. Monitor and Alert
Set up monitoring for:
- Failed authentication attempts
- Unusual traffic patterns
- Expired secrets
- Deprecated grant types
Troubleshooting
Client Not Found
Error: invalid_client
Causes:
- Incorrect Client ID
- Client has been deleted
- Client is disabled
Solution:
- Verify Client ID matches exactly
- Check if client is enabled
- Confirm client exists in Identity Server
Invalid Redirect URI
Error: invalid_redirect_uri
Causes:
- URI not registered
- Case mismatch
- Protocol mismatch (http vs https)
Solution:
- Add exact URI to client configuration
- Check for trailing slashes
- Ensure protocol matches
Scope Not Allowed
Error: invalid_scope
Causes:
- Scope not assigned to client
- Scope doesn't exist
- Typo in scope name
Solution:
- Add scope to client configuration
- Verify scope name is correct
- Check scope exists in Identity Server
Grant Type Not Allowed
Error: unsupported_grant_type
Causes:
- Grant type not configured
- Wrong grant type for client type
Solution:
- Enable required grant type
- Use appropriate grant for client type
- Public clients can't use password flow (requires client secret)
Additional Resources
- Authentication Guide - Complete OAuth 2.0 flow documentation
- Getting Started - Make your first API call
- OAuth 2.0 Specification
- OpenID Connect Documentation
- Contact Support